Retail Transactions
For today’s in-class activity, you don’t need to hand in any code, and therefore you don’t need to fork when you start or push when you finish. You can just clone the activity repo directly.
Learning goals
The activity sets you up to write some Ruby that feels like the sort of Ruby people write in practical software projects out in the wild. Your goals:
- Get more familiar with Ruby. Practice being comfortable with the unfamiliar.
- Practice the sort of test-driven development people often use with dynamically typed languages.
- Experience how metaprogramming can make a general-purpose language (like Ruby) feel like a domain-specific language (DSL).
As you work through this exercise, consider: How would you implement this same task in Java? In Python? How does your development experience differ from those other languages? Get beyond the immediate shock of seeing unfamiliar syntax. Where do you find your attention going as you code in this language vs. the others? Why? What language features shape these differences? (You do not need to write up answers to those questions. Just think about it!)
Part 0: Get set up
This project depends on several third-party libraries, which Ruby calls “gems.” Like most Ruby projects, this project uses Bundler to manage its gem dependencies and their versions. Together, Gems and Bundler are a “package manager.” (You may be familiar with other package managers: pip in Python and npm in Javascript. Both of those are based on RubyGems and Bundler.)
Take a look at Gemfile. It specifies which gems this project depends on, where to install them from, and optionally constraints on which version of the gem to use. (Note that Gemfile is itself Ruby code!)
Now take a look at Gemfile.lock. It specifies which gems bundler actually installed (including indirect dependencies not listed in the gemfile), where bundler got the gems from, and which exact version it installed. Checking this file into git helps ensure that an entire development team is using the same version of all the dependencies, and we don’t get into the situation where the code works for some people but not others.
To install the gems listed in Gemfile:
gem install bundler  # in case you don’t already have it
bundle install       # or you can just type `bundle`
Now test your installation:
bundle exec rake test
(The bundle exec prefix ensures that Ruby is using the exact version of each gem specified in Gemfile.lock. The rake command is a utility for running tasks from the command line. Common uses include running tests, setting up databases, creating test data, etc.)
The tests should run with some skips, but no failures or errors. Look for this at the end of the test output:
... 0 failures, 0 errors ...
If you see that, you’re up and running.
Part 1: Read the code
This problem asks you to do a lot of code reading, and a little code writing.
In lib/retail_transaction.rb, you will find a rudimentary model of a sale on a point of sale system (or “cash register” as we normal humans call it). This class uses a gem called Acts As State Machine (“AASM” for short) to model the different states a transaction can be in, and the actions that cause state transitions:
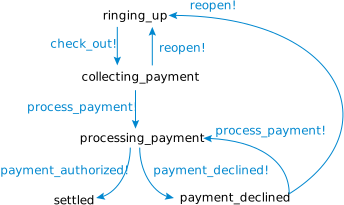
Note how the aasm section in retail_transaction.rb looks as if Ruby has some kind of built-in handling for state machines. It doesn’t! The AASM library added this. Spend some time studying the correspondence between that code and the diagram above. (What is a “state?” An “event?” A “transition?”)
Now take a look at test/retail_transation_test.rb. These tests describe all the expected behavior of a retail transaction in its various states. Things to note:
- Each
itblock is a single test. - Each test takes an action or creates a paricular situation, then makes assertions about it.
- The
letblock at the top creates a transaction we can use for testing. It is namedtx. Thatletblock runs over and over, once for each individual test, so each test begins with the same empty transaction. This is important: it means the tests do not depend on each other, so we can run them individually or in any order. - The
describeblocks group logically related tests. - The
beforeblocks run once before each individual test within their group. They set up a state that all tests within the group share.
(All of this is the minitest/spec library if you want more documentation, though I think the best way to understand the structure is to read it.)
Note that these tests use methods that RetailTransaction does not actually declare. AASM generates them using metaprogramming. Some test whether the object is in a particular state, e.g.ringing_up?. Some trigger a state transition event, e.g. payment_authorized!. There are many others the tests do not use, such as ones that test whether a given state transition is allowed, e.g. may_refund?.
Part 2: Modify the code
Your task is to add and test a new refunded state and refund event, so that the state diagram now looks like this:
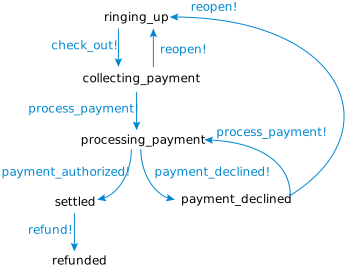
Adding the new state and new event will be easy; adding tests will be a little more tricky. Some hints:
- Add a new test that ensures a settled order can be refunded.
- Add tests to one or two other states that ensure they cannot be refunded. (You don’t need to add that to every other state. Unit testing is all about picking good examples, not about explicitly making every possible scenario happen. Which states might another programmer carelessly assume would allow refunding? Test those.)
- Add a new
describegroup for orders that are already refunded. - Test that transactions cannot be refunded a second time.
- Test that a refunded order cannot be reopened.